
I once spent twelve hours crocheting a bag I was certain would become my everyday companion. I chose the softest merino yarn in a color the shop assistant called “ocean mist.” I worked every stitch with the patience of a monk. When I finished, I held it up and watched it collapse into a shapeless puddle, like a deflated balloon.
It could not stand upright. It could not hold a book without sagging. It looked less like a handbag and more like a sock that had given up on life.
That bag taught me the most expensive lesson in crochet accessories: softness is not a virtue when structure is the goal.
Most crochet bag patterns focus on the decorative shell — the color, the texture, the pretty stitches — while giving much less attention to the architecture underneath. But the base, yarn, lining, and hardware determine whether your finished bag looks intentional or collapses the moment you put something inside it.
A structured crochet duffel combines a firm oval base, dense fabric, reinforced attachment points, and a well-finished opening. The result can look surprisingly polished without the price tag of a designer travel bag.
This guide walks through the construction decisions that matter most, from choosing your cord to adding the final hardware. The measurements and material quantities are planning estimates rather than results from a fully tested, stitch-by-stitch pattern, so make a gauge swatch and check your dimensions as you work.
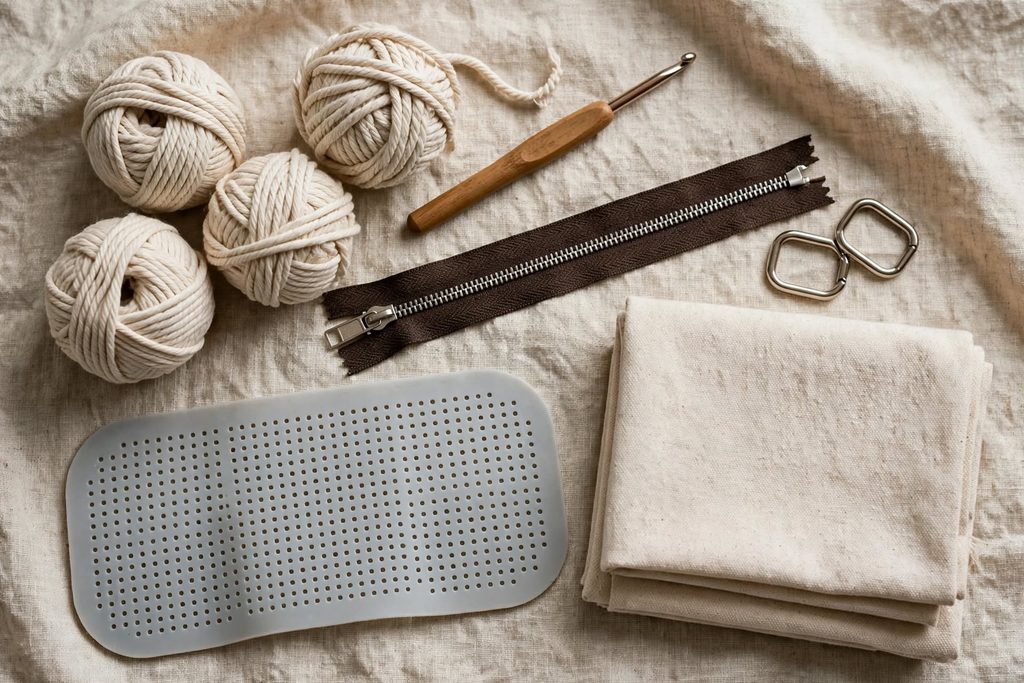
3 Mistakes That Make a Crochet Bag Look Cheap
Before we pick up the hook, let us talk about what goes wrong. Because almost every disappointing crochet bag I have made — and I have made a few — has taught me something about structure.
1. The Base Is an Afterthought
A bag without a firm base is not necessarily a bad bag. But if you want a structured travel duffel, a floppy bottom is going to work against you.
Set it on a café table or an airport floor, and the sides may slump outward. Your keys, wallet, and dignity begin their journey toward the nearest corner.
The fix: Build a firm oval base. You can crochet two matching dense ovals and sandwich a suitably sized, flexible bag-base insert between them. Alternatively, use a purpose-made bag base designed for crochet or handbag construction.
The insert should fit neatly inside the crocheted layers without sharp edges poking through. Choose a material that suits the intended use of the bag, and remember that not every plastic or foam insert is suitable for washing or prolonged exposure to heat.
A firm base helps distribute the contents and gives the body something stable to grow from. It will not make every yarn behave, but it is an excellent place to start.
2. The Yarn Is Too Soft for the Job
A structured bag needs body. Fingering-weight merino may be gorgeous for a shawl, but worked loosely into a large travel bag, it is likely to stretch and sag under weight.
That does not mean thin yarn can never be used for bags. Dense stitches, multiple strands, lining, and reinforcement can all contribute to structure. The problem is expecting a soft, flexible yarn to do all the work by itself.
The fix: Consider cotton cord, sturdy cotton yarn, t-shirt yarn, or a suitable macramé cord. A cord around 3–5 mm thick can be a useful starting point, although the best choice depends on the material, hook size, stitch pattern, and desired drape.
Make a swatch before committing to the entire project. Hold it vertically, stretch it gently, and see how much it moves. If the fabric already looks floppy in your hand, a full-size bag will not magically develop the posture of a luxury handbag.
3. The Finishing Details Are Missing
A crochet bag can be beautifully made and still look unfinished if the opening stretches, the straps twist, or the hardware looks like an afterthought.
A zipper, carefully attached D-rings, a neat lining, and clean edges can make a significant difference. The secret is not adding every possible accessory. It is choosing details that look as though they belong together.
The fix: Plan the hardware before you crochet the body. Decide where the zipper will sit, how the handles will attach, and whether you want a removable shoulder strap. Those decisions affect the dimensions and reinforcement of the bag, so they should not be left until the very last minute.
Materials You Will Need
For a medium-sized structured crochet duffel, use this list as a starting point. Check the manufacturer’s recommendations and make a swatch before buying all your materials.
- Yarn or cord: A sturdy cotton cord, t-shirt yarn, or another suitable firm material. The amount will depend on the cord thickness, stitch pattern, dimensions, and your tension.
- Crochet hook: Start by checking the cord manufacturer’s recommended hook size. Choose a hook that produces dense fabric without making your hands work uncomfortably hard.
- Base insert: A purpose-made bag base or a suitable flexible insert that can be safely enclosed between crocheted layers.
- Zipper: A zipper measured to fit the finished opening. A 30–40 cm zipper may suit some medium bags, but measure your own opening before purchasing.
- D-rings and swivel clasps: Choose hardware rated for the weight and use you expect from the bag.
- Lining fabric: Firm cotton, canvas, or another suitable fabric that complements the exterior.
- Sewing supplies: Strong thread, sewing needles, pins or clips, scissors, and a measuring tape.
- Optional finishing details: Purse feet, a small label, or decorative hardware.
A note about yarn quantity: Do not rely on a single meterage figure unless it has been tested with the same yarn, stitch, and dimensions. Two cords with the same stated thickness can behave very differently. Buy a little extra from the same dye lot whenever possible. Running out of yarn halfway through a bag is a special kind of heartbreak.

The Base: Where Structure Begins
The base is the foundation of the bag. Get its shape and firmness right, and the rest of the construction becomes much easier to control.
Step 1: Make an Oval Base
Begin with a foundation chain sized for the length of the bag you want to make. Work around both sides of the chain to create an oval, adding increases at the ends so the fabric can curve rather than buckle.
The exact number and placement of increases depend on your starting chain, yarn thickness, stitch tension, and the dimensions you want. For that reason, do not simply repeat an increase sequence without checking the shape as you go.
Lay the base on a flat surface regularly. It should remain reasonably flat. If the edges ruffle, you may be adding too many stitches; if the base cups sharply, it may need more increases. Adjust gradually rather than trying to fix a badly shaped oval at the end.
Continue until the base reaches your target length and width. For a medium-sized bag, approximately 30 × 15 cm is a reasonable planning target, not a universal measurement.
Step 2: Reinforce the Floor
Make a second matching oval or use a construction method compatible with your chosen base insert. Place the insert between the crocheted layers and secure the edges neatly.
Check that the insert lies flat and cannot slide around inside the base. Avoid sharp corners that could work their way through the fabric.
The aim is a firm floor that supports the contents without making the bag unnecessarily heavy. Before moving on, set the base down and check that it sits evenly.

The Body: Texture That Looks Intentional
For a structured duffel, choose a stitch that creates a dense, stable fabric. The waistcoat stitch is one option: it uses single crochet worked into the center of the stitch below, creating a knit-like surface with strong vertical lines.
It can look particularly attractive in cotton cord, but it may be harder on the hands than ordinary single crochet. If you find it uncomfortable, use a dense stitch you can work consistently. The best stitch is one that suits both the material and the maker.
Step 1: Establish the First Round
Attach the yarn at the edge of the base and work a round of single crochet around the perimeter. Distribute the stitches evenly along the straight sides and curved ends.
The total stitch count will depend on the finished base and how the stitches are placed. Count the stitches and mark the beginning of the round so you can keep track of your progress.
This first round matters: uneven spacing can pull the base out of shape or leave gaps around the edge.
Step 2: Build the Walls
Continue in your chosen dense stitch, working in rounds until the body reaches the height you want. Keep checking that the walls rise evenly and that the bag maintains its intended shape.
For a medium travel bag, a body height of approximately 25–30 cm is a useful starting point. Your ideal height will depend on the base dimensions, the zipper placement, and what you intend to carry.
If the fabric begins to lean or flare unexpectedly, stop and check your stitch count and tension. A row counter and stitch markers are far less glamorous than a leather label, but they can save an entire evening of unpicking.
Step 3: Add a Front Pocket
A front pocket can make the bag more useful and break up a large expanse of texture.
Crochet a separate rectangle in the same stitch or a complementary pattern. A pocket around 15 cm wide and 12 cm tall may work as a starting point, but adjust it to suit the finished bag.
Pin or clip the pocket in place before sewing. Check that it sits straight and that the top remains open. Use a secure, neat seam, taking care not to distort the body fabric.
The pocket should look like part of the design, not an emergency patch attached after the bag has already made all its decisions.
Handles and Straps: The Architecture of Carrying
A bag can look beautiful on a table and become deeply unpleasant the moment you put it on your shoulder. Thin, uncomfortable straps and weak attachment points can undermine the entire project.
Top Handles
You can make handles from dense crochet strips, a firm crocheted tube, or suitable ready-made handles. If you crochet them, keep the width and thickness consistent and test how they feel in your hand before attaching them.
An I-cord is technically a narrow knitted tube; a crocheted tube or a strip worked through the back loop is not exactly the same construction. Either can be used as a design choice, but name the method accurately in your own project notes.
Position the handles symmetrically and reinforce the attachment points. Do not rely on a single layer of crochet fabric to support a heavily loaded bag.
Removable Shoulder Strap
For a removable strap, use a sturdy strap material or make a firm crocheted strap with suitable reinforcement. A length of around 100–120 cm can be a starting point for a crossbody or shoulder strap, but adjust it to your height and preferred fit.
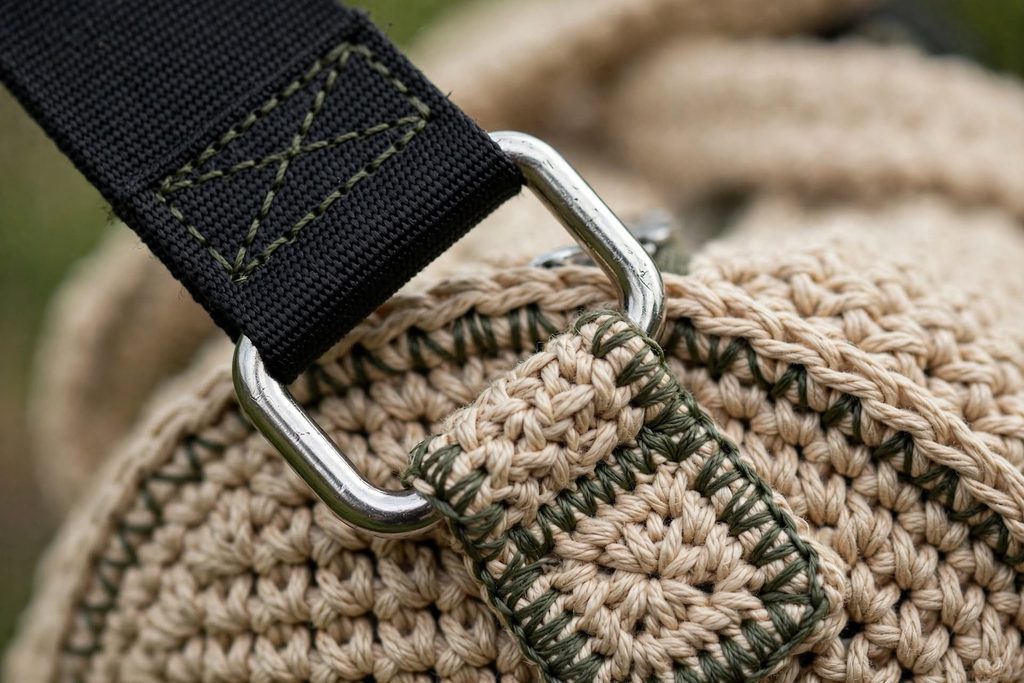
Attach swivel clasps if you want the strap to be removable. Make sure the rings, clasps, and attachment points are compatible with the expected load.
The attachment rule: Reinforce the points that carry weight. Depending on the construction, this may mean anchoring the hardware through several layers, adding webbing, or securing it to a reinforced section of the lining. A strap that pulls out after two weeks is a tragedy easily avoided.
Hardware: The Details That Make the Difference
This is where a handmade bag can start to look boutique.
The Zipper
Measure the finished opening before buying the zipper. The zipper should fit the opening without forcing the fabric to stretch or bunch.
Pin or clip it in place and check that the two sides align. A fabric zipper tape can often be sewn in by hand or machine, depending on your fabric, lining, and machine setup. Work slowly around the ends, and test the zipper several times before finishing the seams.
A zipper helps keep the contents secure and gives a travel bag a more finished appearance. It also means the opening needs to be planned properly rather than squeezed into whatever space remains.
D-Rings and Clasps
Choose hardware that complements the cord and lining. Matte metal can look understated; polished metal creates a more noticeable contrast. Neither is automatically more luxurious. Consistency is what makes the design feel deliberate.
Before final stitching, check that the rings sit at the same height and that the strap hangs evenly.
Purse Feet
Purse feet can lift the base slightly off the ground and protect it from some surface contact. They are optional, and they need to be installed in a way that does not damage the crocheted base or interfere with the insert.
The Label
A small leather or faux-leather label can be a lovely finishing touch. Keep it proportionate to the bag and sew it securely. A label cannot rescue poor construction, but on a well-finished piece it can complete the look.
Sizing and Yardage
Use the table below as a planning guide, not as a tested material guarantee. Actual yarn use and working time will vary with cord thickness, hook size, stitch pattern, tension, lining, and hardware.
| Size | Base dimensions | Body height | Estimated cord | Estimated time |
|---|---|---|---|---|
| Small | About 25 × 12 cm | About 20 cm | Around 350 m | 8–10 hours |
| Medium | About 30 × 15 cm | About 25–30 cm | Around 500–600 m | 12–15 hours |
| Large | About 35 × 18 cm | About 30–35 cm | Around 700–900 m | 18–22 hours |
These figures are rough estimates for project planning. They are not guaranteed amounts for every yarn or stitch combination. A dense waistcoat stitch, for example, may consume a different amount of cord than a simpler stitch worked at the same dimensions.
Pro tip: Make a swatch with your actual cord and hook. Measure it, weigh it if possible, and use it to get a better idea of your material needs before starting the full bag.
The Lining: The Invisible Luxury
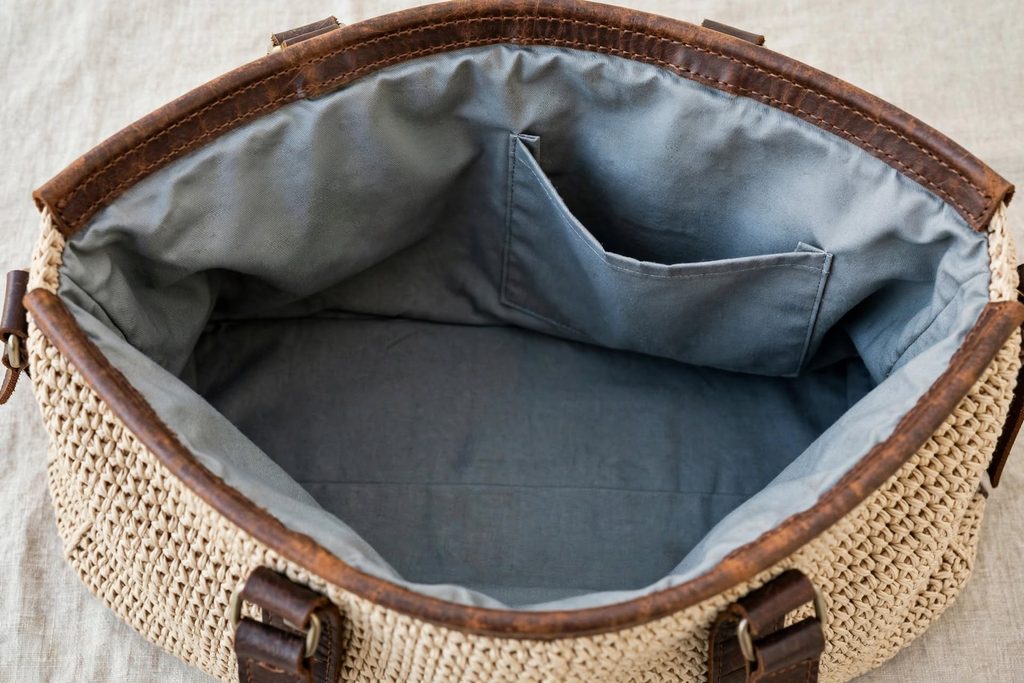
A lining can help protect the crochet fabric, conceal the base insert, and give you useful pockets. It also makes the inside of the bag feel finished rather than like a construction site with excellent exterior lighting.
Measure the inside of your completed bag. Cut the lining fabric to fit, allowing seam allowance, and sew a lining pouch with a base and sides that match the shape of the bag as closely as possible. A simple rectangular lining may work for some designs, but a shaped base can sit more neatly inside an oval-bottomed bag.
Add one or two slip pockets for small essentials. If you want a zippered pocket for keys or valuables, install it before assembling the lining.
Place the finished lining inside the crochet shell and check that it does not pull the body out of shape. Secure it by hand or with a suitable machine-sewn construction, depending on access and the materials involved. Keep the lining clear of the zipper teeth and test the opening before trimming or hiding any excess fabric.
The pocket trick: Give your keys a designated home. It prevents the daily archaeological dig at the bottom of the bag.

Care: Keep the Structure Looking Good
A structured crochet bag needs a little more care than a simple cotton tote, especially if it contains an insert or metal hardware.
- Spot-clean when appropriate. Use a soft cloth and a mild cleaning solution suitable for the yarn. Test an inconspicuous area first.
- Avoid soaking unless the materials allow it. Water can affect some inserts, adhesives, linings, and metal components. Follow the care instructions for the specific materials you used.
- Let the bag dry fully. Keep it away from direct heat, and support its shape while drying if the material permits.
- Store it carefully. Empty the bag and avoid crushing it under heavy objects. Stuffing it lightly with clean tissue or fabric can help it retain its shape.
- Check the hardware periodically. Look for loose stitching around handles, rings, and zipper ends. Repair small problems before they become large ones.
The right care method depends on the cord, lining, insert, and hardware. There is no single washing rule that is safe for every combination.
Frequently Asked Questions
Can I wash a structured crochet bag?
It depends on the materials and construction. Spot-cleaning is often the safer starting point, particularly when the bag contains a rigid insert or metal hardware. Check the care instructions for your yarn and components before washing.
How long does it take to make a crochet duffel bag?
A medium-sized bag may take roughly 12–15 hours as a planning estimate, including finishing. Your actual time will depend on the stitch, cord, experience, and how much time the lining and hardware require.
What yarn is best for a structured crochet bag?
Cotton cord, sturdy cotton yarn, and some types of t-shirt yarn can work well. Choose material that creates a stable fabric with your chosen stitch. Thickness alone does not guarantee structure.
Do I need a lining?
Not every crochet bag needs one. For a travel duffel that will carry heavier items, a lining can help protect the fabric, conceal the base insert, and add useful pockets. Reinforcement is especially important around the straps and other load-bearing points.
Can I add a crossbody strap?
Yes. Use a suitably strong strap, compatible swivel clasps, and reinforced attachment points. If you crochet the strap yourself, test it under a realistic load before relying on it.
The Final Stitch
A structured crochet duffel is not just a large rectangle with handles attached. It is a small exercise in design: choosing a material that behaves well, building a stable base, keeping the body even, and finishing every edge with intention.
The yarn matters. The stitch matters. But so do the decisions you make before you start — and the unglamorous reinforcement that no one notices until it fails.
You do not need to imitate a designer bag down to the last metal clasp. You need a bag that suits your life, carries what you need, and holds its shape because you built it to do exactly that.
Some bags are accessories. This one is architecture.