
I once spent three weeks crocheting what I believed would be the centerpiece of my living room. A mandala. Dozens of rounds. Hundreds of color changes. When I finally blocked it and held it up, it was beautiful — and completely invisible against my white wall. It looked like a colorful pancake that had given up on gravity. I pinned it, framed it, even tried leaning it on a shelf. Nothing worked. It was not a wall hanging. It was a very patient doily with delusions of grandeur.
That mandala taught me the difference between a crochet circle and a crochet wall hanging: the dowel, the fringe, and the intention.
Before we begin, let me save you from the same mistake. Many crochet mandala patterns stop at the last round, as if the piece is finished simply because the yarn ran out. But a mandala without a hanging system is a coaster for a giant. Below is a complete method — from the center ring to the final fringe — for creating a boho wall tapestry that feels at home on your wall.
3 Mistakes That Make Crochet Wall Hangings Look Like Doilies
The Center Is Too Heavy

A mandala that grows outward evenly can become visually dense, especially when every round uses solid stitches. When you hang it, the center may sag or the outer edge may curl. The circle that looked perfect on the table suddenly looks less than perfect on the wall.
The fix: Introduce open stitches toward the outer edge. Chain spaces and mesh create a lighter visual finish, although the final shape still depends on your tension, yarn, and blocking.
There Is No Hanging Mechanism
I have seen people tape their crochet mandalas to the wall. I have seen them use thumbtacks through the yarn. I have seen them lean them against bookshelves and pretend it was a stylistic choice. A wall hanging needs a structure that holds it vertically.
The fix: Use a wooden dowel or a suitable driftwood branch. Add secure hanging loops at the top so the dowel supports the piece instead of putting all the strain on one point of the crochet fabric.
The Fringe Is an Afterthought
A mandala without fringe is a plate. A mandala with fringe is a tapestry. The fringe adds movement, length, and a little drama. It helps turn a decorative circle into a statement piece.
The fix: Plan the fringe before you finish the project. Longer fringe creates a relaxed, bohemian look; shorter fringe gives the design a neater, more contemporary finish. Choose the length that suits your space rather than cutting it at random.
Materials You Need
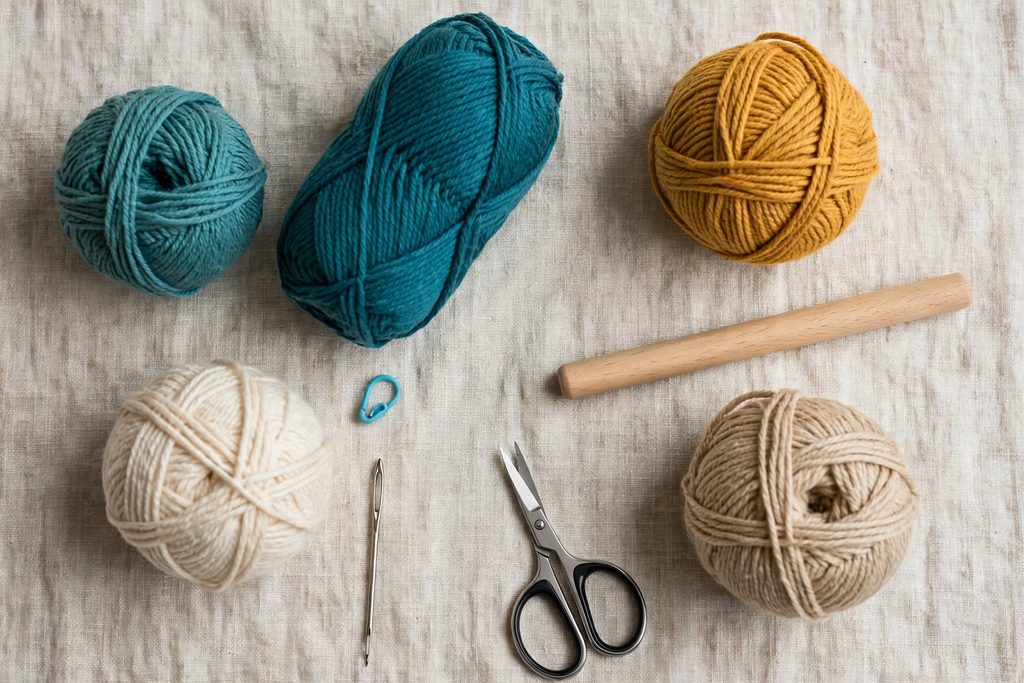
- Yarn: Approximately 200–300 meters total of DK or worsted-weight cotton or cotton-blend yarn in 3–4 colors. The exact amount depends on your tension and the finished size. For an ocean-inspired palette, try teal, mustard, cream, and sand.
- Hook: 4.0 mm (US G/6) or 4.5 mm (US 7), chosen to suit your yarn and tension.
- Wooden dowel or driftwood: Approximately 30–40 cm long and 1.5–2 cm in diameter.
- Stitch marker.
- Tapestry needle.
- Sharp scissors.
- Measuring tape and rust-resistant pins for blocking, if suitable for your yarn.
Gauge is not critical for a decorative wall hanging, but your stitches should be even. If the fabric curls or develops waves, you may need to adjust your hook size or tension.
The Mandala — Crochet Pattern (US Terms)
This 12-round mandala begins with a solid center and gradually introduces open spaces. The pattern uses US crochet terminology.
Abbreviations
- ch: chain
- sl st: slip stitch
- sc: single crochet
- dc: double crochet
- st(s): stitch(es)
- sp: space
Important notes before you begin
- Unless a round says otherwise, the beginning ch-3 does not count as a stitch. Work the first stitch into the same stitch as the beginning chain and join to the first actual stitch of the round.
- In Round 7, ch-4 counts as one dc and one ch-1 space.
- In Round 11, ch-5 counts as one dc and one ch-2 space.
- Place a stitch marker in the first actual stitch of each round if you find it difficult to keep track of the join.
- The stitch counts below assume you follow these instructions consistently.
Round 1 — Center Ring
Make a magic ring, or ch 4 and join with a sl st to form a ring.
Ch 3 (does not count as a stitch), work 12 dc into the ring. Join with a sl st to the first dc.
Stitch count: 12 dc
Round 2 — First Increase
Ch 3 (does not count as a stitch). Work 2 dc in each stitch around. Join to the first dc.
Stitch count: 24 dc
Round 3
Ch 3. Dc in the next stitch, 2 dc in the next stitch. Repeat from * around. Join to the first dc.
Stitch count: 36 dc
Round 4
Ch 3. Dc in each of the next 2 stitches, 2 dc in the next stitch. Repeat from * around. Join to the first dc.
Stitch count: 48 dc
Round 5
Ch 3. Dc in each of the next 3 stitches, 2 dc in the next stitch. Repeat from * around. Join to the first dc.
Stitch count: 60 dc
Round 6
Ch 3. Dc in each of the next 4 stitches, 2 dc in the next stitch. Repeat from * around. Join to the first dc.
Stitch count: 72 dc
Round 7 — Open Mesh
Ch 4 (counts as 1 dc and ch 1), skip the next stitch, dc in the next stitch, ch 1, skip the next stitch. Repeat from * around. Join with a sl st to the third chain of the beginning ch-4.
Stitch count: 36 dc and 36 ch-1 spaces
Round 8 — Double-Crochet Clusters
Sl st into the first ch-1 space. Ch 3 (does not count as a stitch), work 2 dc in the same space, then ch 1.
Work 2 dc in the next ch-1 space, ch 1. Repeat from * around. Join to the first dc of the round.
Stitch count: 72 dc and 36 ch-1 spaces
Round 9 — Filling the Mesh
Ch 3. Dc in each of the next 2 dc, dc in the next ch-1 space. Repeat from * around, working into every dc and every ch-1 space. Join to the first dc.
Stitch count: 108 dc
Round 10 — Firm Foundation
Ch 1 (does not count as a stitch). Sc in each stitch around. Join to the first sc.
Stitch count: 108 sc
Round 11 — Lighter Outer Edge
Ch 5 (counts as 1 dc and ch 2), skip the next 2 stitches, dc in the next stitch, ch 2, skip the next 2 stitches. Repeat from * around. Join with a sl st to the third chain of the beginning ch-5.
Stitch count: 36 dc and 36 ch-2 spaces
Round 12 — Final Edge
Ch 1 (does not count as a stitch). Sc in the next dc, work 2 sc in the next ch-2 space. Repeat from * around. Join to the first sc and fasten off.
Stitch count: 108 sc
At this point, the mandala is complete. The hanging loops will be added separately so you can position them accurately along the top instead of forcing them into the stitch repeat.
Blocking and Shaping
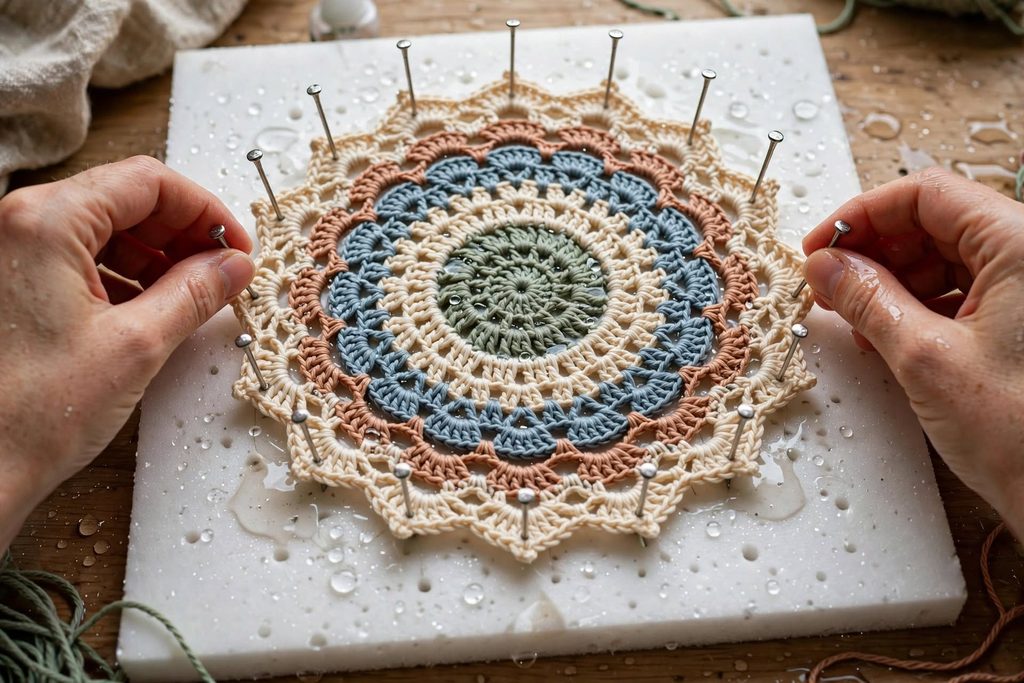
Blocking can help even out your stitches and encourage the mandala to lie flat. The right method depends on your yarn, so check its care instructions before soaking or applying heat.
If your yarn is suitable for wet blocking:
- Gently wet the mandala with lukewarm water.
- Press out excess water without wringing or twisting the fabric.
- Place it on a blocking mat or another suitable surface.
- Shape it into a circle and pin the edge evenly, without stretching the stitches excessively.
- Let it dry completely before removing the pins.
If your yarn requires a different method, follow the manufacturer’s care guidance. Do not assume every fiber can safely be soaked or steam-blocked.
Blocking is not magic, but it can make the difference between an uneven circle and a polished wall piece.
The Dowel and Hanging Loops
Attaching the Dowel
Choose a dowel or branch slightly wider than the mandala. Check that the wood is smooth and sturdy enough to support the finished piece.
Lay the mandala flat and mark the top center. Then mark two additional points on the upper arc, one on either side of the center. Position the side marks symmetrically so the hanging weight is distributed evenly.
Making Three Hanging Loops
For a simple three-point hanging system:
- Attach the yarn securely at the first marked point along the upper edge.
- Ch 10, or add a few chains if needed to fit comfortably over your dowel.
- Sl st into the same marked stitch to form a loop.
- Secure the yarn and weave in the end.
- Repeat at the center and the other marked point.
Check that all three loops are approximately the same length. Before hanging the mandala, place the dowel through the loops and hold it up gently to see whether the piece hangs level. Adjust the loops if necessary.
If you prefer a more minimal look, two sturdy loops near the upper sides may be enough for a small, lightweight piece. The hanging method should suit the finished weight and the surface where it will be displayed.
Adding the Fringe
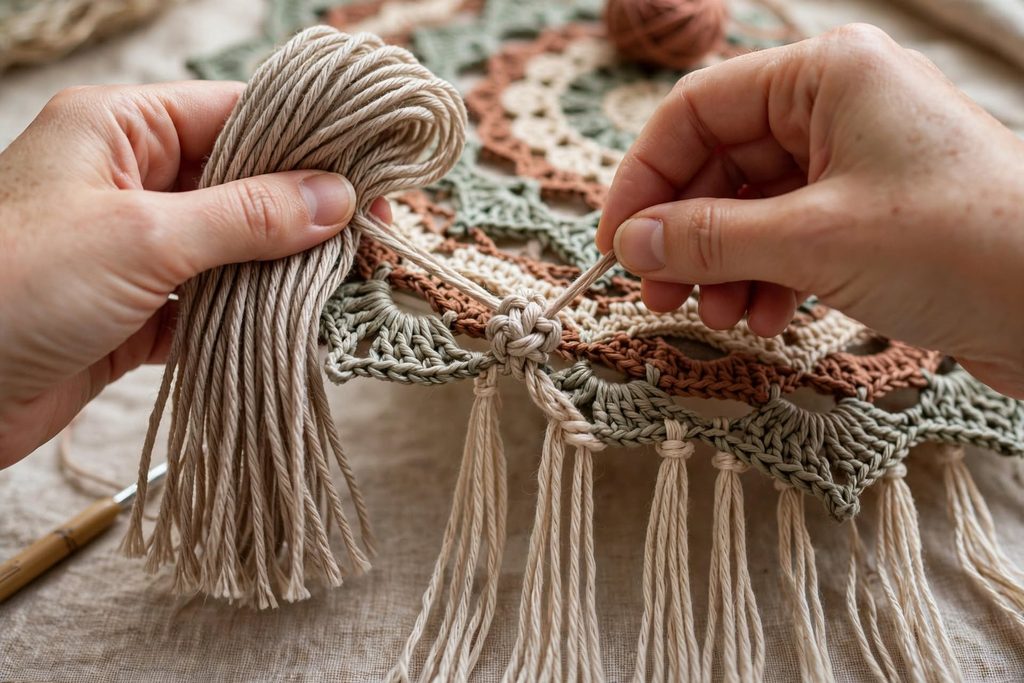
Fringe gives the mandala its tapestry-like finish. It is easiest to attach after blocking, when you can see the shape and identify the bottom arc.
- Cut approximately 40–50 individual strands of yarn, each about 40 cm (16 inches) long. This is a starting estimate; the number you need depends on the width of the mandala and how closely you want the fringe spaced.
- Fold each strand in half. Each strand will create two tails of approximately 20 cm before trimming.
- Insert your hook through a stitch along the lower arc of Round 10, the solid single-crochet round.
- Fold one strand in half and pull the folded end through the stitch to form a loop.
- Pull both loose ends through that loop and tighten gently to make a lark’s head knot.
- Continue along the bottom arc, spacing the strands evenly. Avoid attaching fringe around the entire circle unless you specifically want a full, sunburst effect.
- Comb the fringe gently with your fingers and trim the ends evenly, into a soft V-shape, or leave them slightly irregular for a more organic look.
Do not pull the knots so tightly that they distort the edge. If your mandala is small, use fewer strands; if it is larger, you may need more to achieve the same visual density.
Hanging and Styling
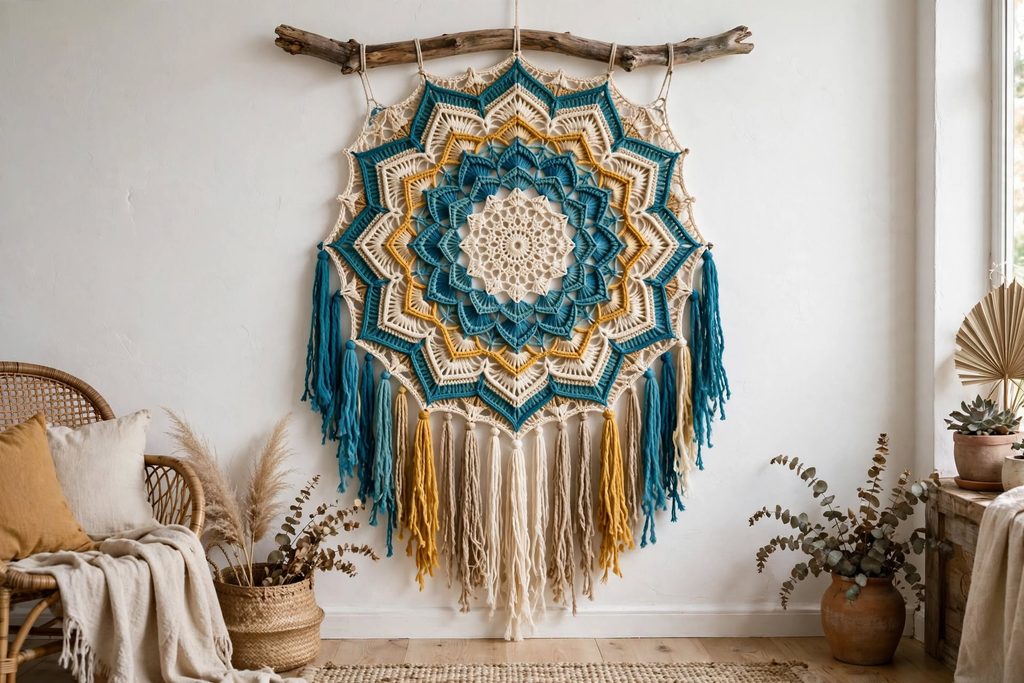
A finished crochet wall hanging can work above a reading chair, beside a bed, or as part of a gallery wall. Give it enough breathing room so the open stitches and fringe remain visible.
- Choose a comfortable height. As a starting point, position the center of the piece around eye level. Adjust for furniture, ceiling height, and the size of the mandala.
- Use contrast thoughtfully. A white or cream wall can make saturated colors stand out. A deep navy or charcoal wall can create a dramatic backdrop. Busy wallpaper may compete with the pattern.
- Add natural textures. A wooden shelf, linen cushion, ceramic vase, or woven basket can complement the yarn and fringe.
- Bring in greenery. A trailing pothos or another suitable houseplant can soften the geometry of the mandala and help create a relaxed, curated corner.
- Leave space around the fringe. Avoid placing the piece where doors, drawers, or people will constantly brush against it.
The aim is not to fill every empty inch of wall. It is to make the mandala feel as though it belongs there.
FAQ
How long does it take to crochet this wall hanging?
The time depends on your experience, yarn, tension, and color changes. Allow several hours for the crochet itself, plus additional time for blocking, adding the loops, attaching the fringe, and finishing. A first project may take considerably longer than an experienced crocheter expects.
What yarn is best for crochet wall hangings?
Cotton and cotton-blend yarns often provide clear stitch definition and a structured appearance. DK and worsted weights are both options, but they produce different fabric densities and finished sizes. Choose a yarn that suits the look you want and check its care instructions before blocking.
Do I need to block a crochet wall hanging?
Blocking can help even out the stitches and encourage the mandala to lie flat. Whether you need it, and which method to use, depends on your yarn and the condition of the finished piece.
Can I use an embroidery hoop instead of a dowel?
Yes. A suitable wooden embroidery hoop can work as a frame for a smaller mandala. Make sure the hoop is sturdy, the fabric is attached securely, and the finished piece is not too heavy for the frame or its hanging hardware.
How do I clean a crochet wall hanging?
Remove dust with a soft brush or a hairdryer on a cool, gentle setting. For small marks, spot-clean only if the yarn’s care instructions allow it. If the piece needs a deeper clean, follow the yarn manufacturer’s guidance and consider removing the dowel first. Machine washing may distort the crochet or tangle the fringe, so do not assume it is safe.
The Final Loop
A crochet wall hanging is not just a decoration. It is a declaration. It says that you have the patience to work in rounds, the courage to cut fringe, and the confidence to hang your own art where everyone can see it.
The mandala does not need a frame. It needs a wall. The fringe does not need perfect symmetry. It needs movement. And you do not need permission to turn yarn into architecture.
Make it in ocean colors. Make it in sunset colors. Make it in black and cream if that is what your wall demands.
Then hang it where you can see it every day — and let that patient little circle finally become the centerpiece it was meant to be.